Windows 11 version 24H2 is approaching a real support deadline, but the date does not apply equally to every edition. Microsoft says Windows 11 24H2 Home and Pro editions reach end of updates on October 13, 2026. Enterprise and Education editions continue receiving updates until October 12, 2027. That distinction matters because many headlines shorten the story to “24H2 support is ending,” which can make business-managed PCs look more urgent than they actually are.
For most people using an unmanaged Home or Pro PC, the practical destination is Windows 11 version 25H2. Microsoft currently lists 25H2 as the latest generally available version for existing Windows 11 PCs and says eligible unmanaged 24H2 Home and Pro devices will be offered the update automatically. The safest plan is still to verify your version, protect irreplaceable files, confirm your recovery options, and then upgrade through Windows Update when Microsoft says the device is ready.
You can verify the lifecycle dates on the Windows 11 Home and Pro lifecycle page and the current rollout guidance on Microsoft's Windows 11 24H2 release-health page.
Misunderstanding #1: “October 13 means Windows 11 24H2 stops working”
What is confirmed: Home and Pro devices on 24H2 stop receiving the normal stream of fixes, time-zone updates, technical support, and monthly security and preview updates after October 13, 2026. The operating system does not suddenly refuse to boot on that date.
What depends on your situation: A PC that remains on an out-of-support release may continue to run, but the security and compatibility risk grows over time because new vulnerabilities and known issues are no longer handled through the normal servicing channel for that release.
What to do: Treat October 13 as a deadline for getting onto a supported release, not as a shutdown date. If you have Home or Pro, plan the upgrade before then rather than waiting for the final week.
Step 1: Confirm that you are actually on 24H2
Before changing anything, verify the installed edition and version. Microsoft documents two easy checks: open Settings > System > About and look under Windows specifications, or type winver in taskbar Search and press Enter.
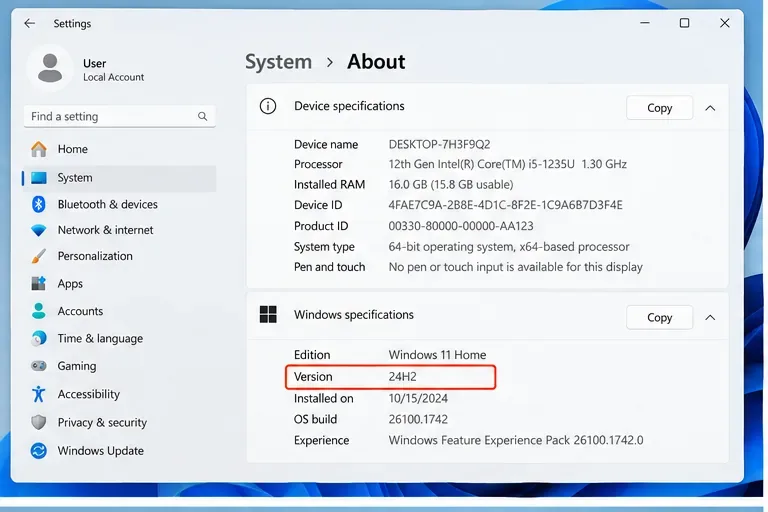
Caption: First confirm the installed Windows version under Settings > System > About. This schematic view highlights where the 24H2 version label appears.
If the Version field already says 25H2, this particular end-of-support deadline is no longer your immediate problem. Microsoft currently lists 25H2 Home and Pro support through October 12, 2027. If you are on 24H2 Enterprise or Education, your lifecycle is also different from Home and Pro.
Misunderstanding #2: “I should jump straight from 24H2 to 26H1”
What is confirmed: Microsoft says Windows 11 version 26H1 is intended for new devices with select newer silicon and is not offered as an in-place update from 24H2 or 25H2 on existing devices. For a normal existing PC, 26H1 is not the upgrade target you should chase.
What to do: For an existing 24H2 PC, check Windows Update for 25H2. Do not download unofficial images or try unsupported workarounds just because 26H1 has a higher version number.
Step 2: Back up the files you cannot replace
An in-place feature update is designed to preserve your files, apps, and settings, but “designed to preserve” is not the same thing as “backup.” A backup protects you against a failed upgrade, accidental deletion, storage failure, or choosing the wrong reinstall option.
For personal files, use at least one independent copy outside the system drive. That can be OneDrive, another trusted cloud service, an external SSD or hard drive, or a combination of cloud and external storage.
Microsoft's Windows Backup can protect selected folders such as Desktop, Documents, Pictures, Videos, and Music by syncing them to OneDrive. It can also remember some settings and app information. You can review it through Settings > Accounts > Windows backup or by opening the Windows Backup app. Microsoft's instructions are in Back up and restore with Windows Backup.
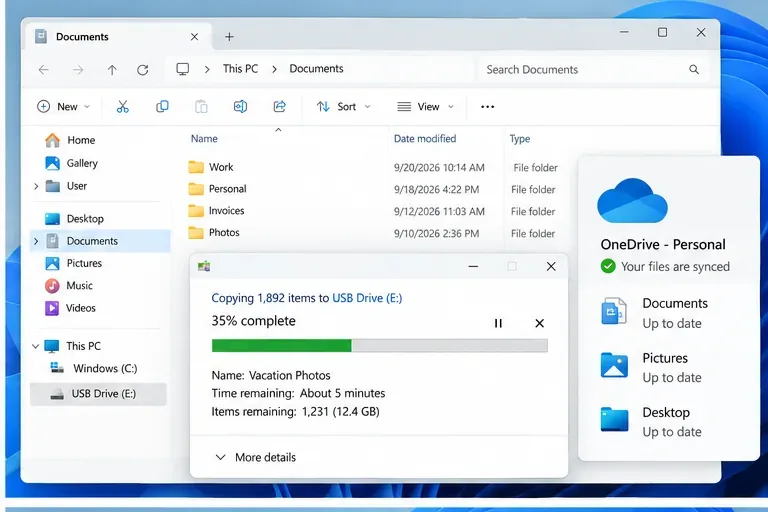
Caption: Make a separate copy of important files before the upgrade. Cloud sync and an external drive can provide two independent recovery paths.
Do not assume OneDrive covers every file on the PC
What is confirmed: OneDrive folder backup targets specific user folders you enable. Files stored elsewhere — for example, a custom project folder at C:\Work, local virtual-machine disks, game saves outside synced locations, or archives on another internal drive — may not be included automatically.
What to do: Open File Explorer and make a short inventory of anything important outside Desktop, Documents, Pictures, Videos, and Music. Copy those items separately if they are not already protected.
Verify the backup instead of trusting the progress icon
Open several important files from the backup destination. If you use OneDrive, confirm the relevant folders show a healthy sync state and, ideally, check them from the OneDrive website or another device. If you use an external drive, safely eject it after copying and reconnect it to confirm the files are readable.
Step 3: Save your BitLocker recovery key before changing Windows
Windows 11 devices may use BitLocker or Device Encryption. Normally the drive unlocks automatically, but recovery can be requested after certain security or hardware changes. Microsoft states that a BitLocker recovery key is a 48-digit number and that Microsoft Support cannot recreate a lost key.
If your recovery key is associated with your Microsoft account, you can retrieve it through Microsoft's recovery-key page. The official guidance is available at Find your BitLocker recovery key.
What to do: Before upgrading, confirm that you know where your recovery key is stored. Do not keep the only copy on the same encrypted PC you are about to update.
Step 4: Check Windows Update before using installation media
For most supported PCs, Windows Update is the lowest-risk path because Microsoft can apply compatibility checks and safeguard holds. A safeguard hold temporarily prevents an update from being offered to devices with a known compatibility problem.
Go to Settings > Windows Update and select Check for updates. Microsoft says eligible 24H2 Home and Pro devices that are not managed by an IT department will receive the 25H2 update automatically, while users can choose when to restart or postpone the restart.
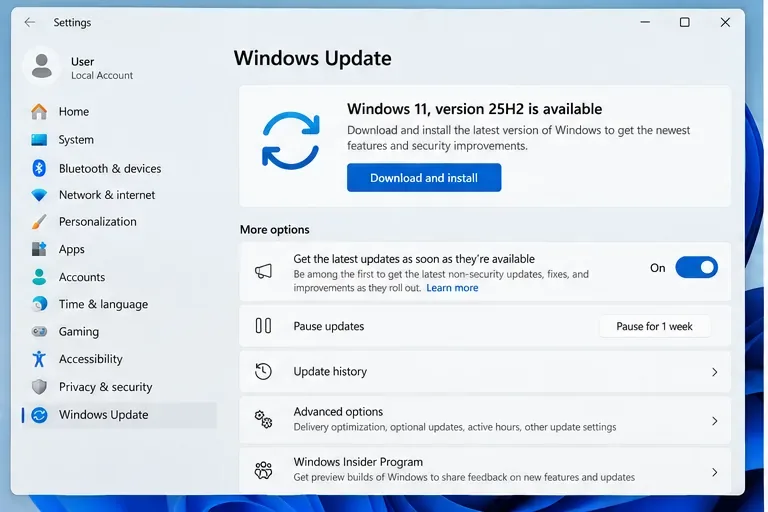
Caption: Windows Update is the preferred first route because it can account for Microsoft's compatibility checks and safeguard holds before offering 25H2.
If 25H2 is not offered, do not immediately assume something is wrong
What is confirmed: Microsoft may pause an upgrade on a specific device when it detects a known compatibility issue. That is a safeguard hold, not proof that the hardware can never run the update.
What is uncertain: Without seeing your exact hardware, drivers, installed software, and Microsoft's current hold list, no generic guide can tell you why a particular PC has not received 25H2.
What to do: Check the official release-health pages, install normal cumulative and driver updates, and look for manufacturer firmware or driver updates. Avoid forcing the feature update merely to beat the rollout if Microsoft is withholding it for compatibility reasons.
Misunderstanding #3: “Reset this PC with Keep my files is the same as an upgrade”
It is not. Microsoft says Reset this PC > Keep my files reinstalls Windows and preserves personal files, but it removes apps and settings. That makes Reset useful for repair scenarios, not the normal way to move from 24H2 to 25H2.
For the least disruptive upgrade, use Windows Update. If you later need installation media, Microsoft documents an in-place path that can preserve personal files and apps.
What to do: Do not choose Reset just because you see the words “keep my files.” Use it only if you understand that applications and settings are removed. Microsoft's comparison of recovery choices is in Recovery options in Windows.
Step 5: If you use installation media, check “what to keep” before clicking Install
Microsoft's documented in-place setup path can retain your files and applications when you start Setup from within your current Windows installation. On the Ready to install page, the default may be Keep personal files and apps. You can select Change what to keep to review the alternatives.
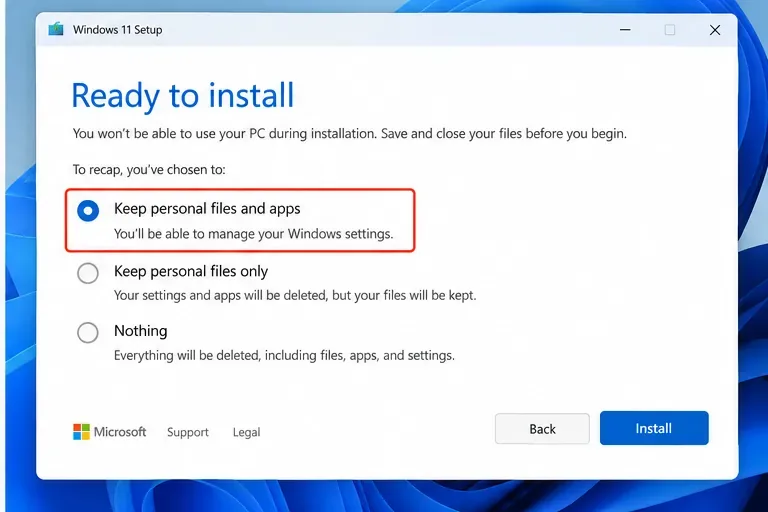
Caption: If you use installation media from inside Windows, verify that “Keep personal files and apps” is selected before proceeding. This is the critical choice that preserves installed apps as well as files.
Microsoft lists three relevant choices:
- Keep personal files and apps: keeps personal data, applications, and Windows settings.
- Keep personal files only: keeps personal data but removes applications.
- Nothing: removes personal data, apps, and settings.
The official instructions are available in Reinstall Windows with installation media.
Do not boot from the USB if your goal is an in-place upgrade that preserves everything
What is confirmed: Microsoft warns that a clean installation started by booting from installation media wipes the existing installation and its contents. That is fundamentally different from opening setup.exe from inside Windows and choosing what to keep.
What to do: If your goal is to preserve apps and files, start Setup from the running Windows desktop and verify the retention choice before installation. Boot from USB only when you deliberately want a clean install and have a complete backup.
Step 6: Prepare the PC for a smoother upgrade
Before you start, connect a laptop to power and leave enough free disk space for Windows Setup to work. Save open documents, close applications, and disconnect unnecessary external storage devices so you do not accidentally select or format the wrong drive during troubleshooting.
If you depend on specialized software — accounting tools, VPN clients, audio interfaces, virtual machines, endpoint security software, CAD applications, or older printers — check the vendor's compatibility information first. Microsoft can validate Windows-level compatibility, but it cannot guarantee that every third-party workflow behaves exactly as before.
Step 7: After the upgrade, verify the files before deleting any fallback copy
When the upgrade completes, check Settings > System > About again and confirm that the version now reads 25H2. Then open your most important documents, photos, databases, project files, and application data.
Do not immediately erase your external backup. Keep it until you have used the upgraded PC long enough to confirm that the files, applications, printers, network drives, and other essentials work as expected.
You may have a limited rollback window
Microsoft's recovery documentation says the option to go back to the previous Windows version is generally available for 10 days after an upgrade. Going back keeps personal files, but removes apps, drivers, and settings added or changed after the upgrade.
What to do: If a critical incompatibility appears soon after the upgrade, review Settings > System > Recovery before the rollback window expires. Do not treat rollback as a substitute for backup, because changes made after the upgrade can still be lost.
What if your PC never gets 25H2?
If Windows Update still does not offer 25H2 close to the end-of-support date, first determine whether the PC is managed by an employer or school. Managed devices can follow different deployment policies. On a personal PC, check Microsoft's release-health page for open compatibility holds and your PC manufacturer's support pages for BIOS, firmware, chipset, storage, and graphics updates.
If Microsoft explicitly blocks the upgrade because of a known issue, forcing it can trade a support deadline for a broken system. If the device cannot move to a supported Windows version through a supported path, then the long-term decision may be hardware replacement rather than an unsupported installation.
Pre-upgrade checklist
| Check | Why it matters |
|---|
| Confirm edition and version | 24H2 Home/Pro ends October 13, 2026; Enterprise/Education has a different date. |
| Back up irreplaceable files | An upgrade is not a backup. |
| Verify OneDrive or external copies | A completed-looking sync is only useful if the files are actually accessible. |
| Save the BitLocker recovery key | You may need it to regain access to an encrypted drive. |
| Check Windows Update first | It can respect compatibility safeguards before offering 25H2. |
| Check critical app and device support | Drivers and specialized applications can be the real upgrade blockers. |
| Review “what to keep” in Setup | The wrong option can remove applications or files. |
| Keep the backup after upgrading | Verify the new installation before deleting your safety copy. |
The safest upgrade plan in one sentence
For a normal Windows 11 24H2 Home or Pro PC, the safest plan is to verify that you are actually on 24H2, create and test a separate backup, save your BitLocker key, let Windows Update offer 25H2 when the device is ready, and confirm your files and apps afterward before removing the backup.
That approach avoids the two biggest mistakes: assuming an in-place upgrade makes a backup unnecessary, and forcing an update when Microsoft is deliberately holding it back for compatibility. The October 13, 2026 deadline is important, but protecting your data and staying on a supported path matters more than upgrading as fast as possible.